
Remember me


In this paragraph we describe the major steps of mammary gland tissue collection for isolation of primary MGOs. The reader is kindly referred to other, more detailed versions of this protocol for graphical aids [15,16,17].
1.After euthanasia, pin the mouse to the dissection board and wash the ventral side with 70% EtOH.
2.Using forceps lift the abdominal skin and make a small incision in the midline. Use this incision as a starting point to make sagittal cuts towards the neck and the tail, then make cuts towards the limbs.
3.Lift and slightly pull away the skin on one side of the mouse. Use a cotton bud to help separate the skin from the peritoneum. Pin the skin to the dissection board and repeat on the opposite side (see Note 11).
4.Remove the lymph node from the mammary glands number four and collect the remaining mammary tissue together with the mammary glands number three into a 2 mL centrifuge tube with cold PBS (see Note 12).
Primary mammary epithelial organoid isolationBefore starting, prepare ice in a styrofoam box and preheat the water bath and orbital shaker to 37 °C. Make sure that the centrifuge is set for the room temperature (RT). The following steps should be performed in a biosafety cell culture hood.
1.Prepare digestion solution 1 (10 mL per mouse) in a 50 mL tube, pre-warm it in a water bath, and filter-sterilize.
2.Transfer the mammary gland tissue to a sterile 100 mm Petri dish. Remove the excess of PBS and use scalpels to chop the tissue into small pieces approximately 0.5 × 0.5 × 0.5 mm3 in size and then transfer the chopped tissue to the tube containing digestion solution.
3.Place the tube containing tissue in digestion solution horizontally in the incubated orbital shaker and incubate at 110 rpm, 37 °C for 30 min.
4.After incubation, inspect the digested tissue. If no large pieces remain, proceed with the next steps. If large pieces of tissue are still visible, extend the incubation time accordingly.
5.Centrifuge the suspension at 450 × g for 10 min.
6.Meanwhile, coat 15 mL tubes with BSA solution; prepare 1 tube per each approx. 10 mL of digestion solution. Use BSA-coated tubes, pipettes, and pipette tips for all sample handling (see Note 13).
7.After centrifugation, transfer the supernatant from the 50 mL tube to the coated 15 mL tubes at a maximum volume of 10 mL per tube. Leave the pellet in the 50 mL tube.
8.Add DMEM/F12 to each tube to a total volume of 14 mL and mix well. Centrifuge the tubes at 450 × g for 5 min.
9.Meanwhile, resuspend the pellet from the 50 mL tube in 4 mL of DMEM/F12 (see Note 14).
10.After centrifugation, aspirate the supernatants from the 15 mL tubes.
11.Perform a series of pellet resuspensions by collecting the resuspended cells from the initial 50 mL tube (in 4 mL) and transferring the suspension to the pellet in the first 15 mL tube. Resuspend the pellet from this tube with the cell suspension from the 50 mL tube and use the entire volume to repeat the resuspension in the next 15 mL tube. Repeat until you reach the last 15 mL tube, resuspend the pellet and leave the entire suspension in the tube. Add 4 mL of DMEM/F12 to the 50 mL tube, wash the inside of the tube with it, and repeat the transfer and wash in the 15 mL tubes. Collect the suspension in the final 15 mL tube containing the pooled cell suspensions. Empty tubes may be discarded after this step.
12.Centrifuge the suspension at 450 × g for 5 min.
13.Aspirate the supernatant and resuspend the pellet in 4 mL of DNase I working solution (see Note 14). Incubate for 5 min at RT while shaking gently.
14.Add 6 mL of DMEM/F12 and mix well.
15.Centrifuge the suspension at 450 × g for 5 min.
16.Aspirate the supernatant and resuspend the pellet in 9 mL of DMEM/F12.
17.Perform differential centrifugation: Centrifuge at 450 × g for 10 s (see Note 15).
18.Repeat steps 17 and 18 four more times for a total of 5 times.
19.After the last round of differential centrifugation, resuspend the pellet in 1-2 mL of basal organoid medium and place on ice until further use (see Note 16).
20.Count the number of organoids. Resuspend the organoid suspension with a 1 mL automated pipette. Immediately take 20 µL of the suspension and place it in two drops (approximately 10 µL each) on a cell culture dish (see Note 17). Count the organoids in the drops using an inverted microscope.
21.Calculate the organoid concentration and total number of organoids in the 15 mL tube.
$$\mathrm c\left(\mathrm\right)\;=\mathrm n\left(\mathrm\;\mathrm\;20\;\mathrm\right)\;/\;\;20\;\mathrm\;\rightarrow\;\mathrm\;/\;\;\mathrm$$
$$\mathrm n\left(\mathrm\right)\;=\;\mathrm c\left(\mathrm\right)\;\ast\;\mathrm V\;\left(\mathrm\;\mathrm\right)$$
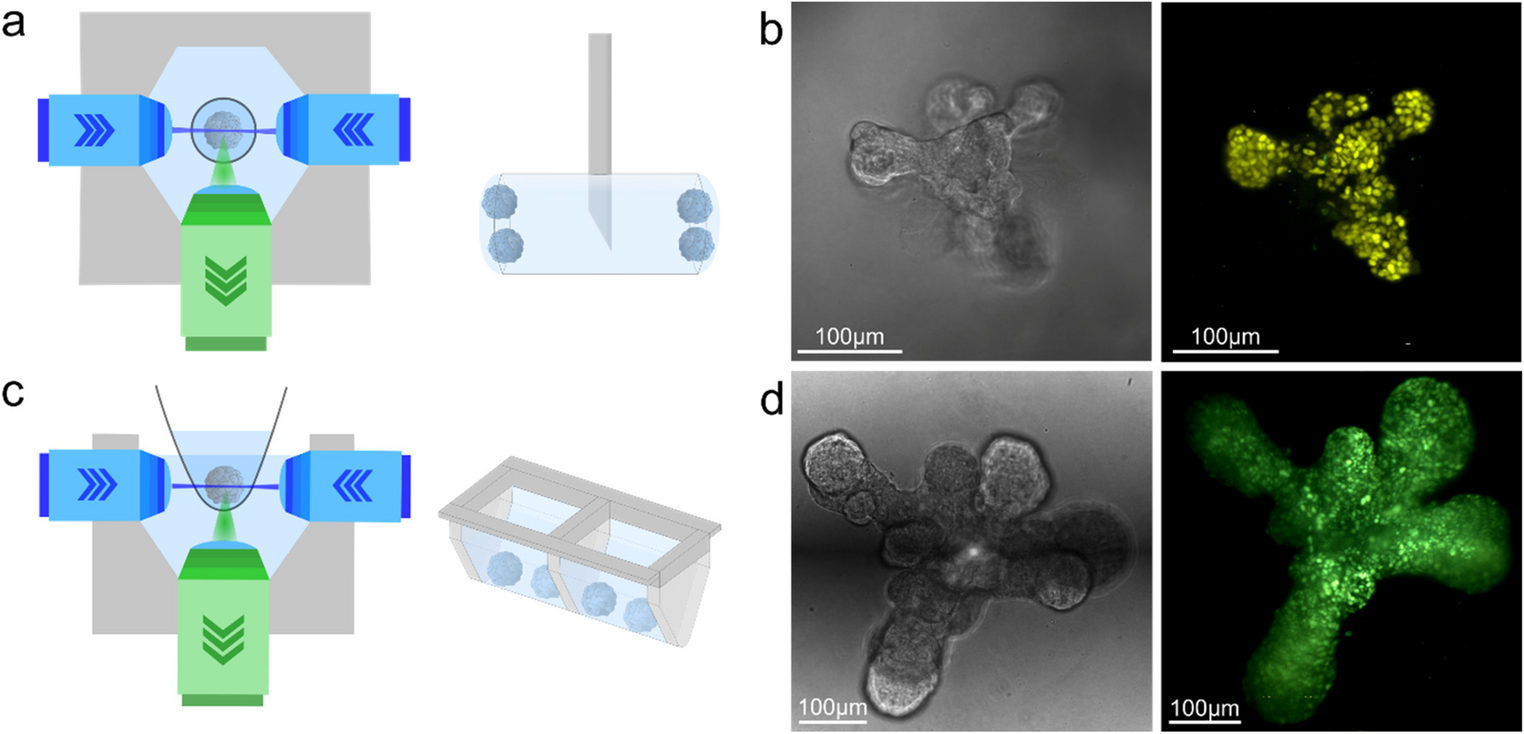
Cryopreservation of primary organoidsPrimary organoids can be cryopreserved for a later use. We recommend use of serum-free cryopreservation media because in our experience they provide better viability and morphogenetic response after organoid revival (Fig. 2). Before starting, prepare your cell freezing container and bring it to RT if necessary.
Fig. 2
Morphogenesis of revived organoids in a 3D culture. Organoids were frozen with different freezing media (indicated in the top panel), thawed after 5 weeks' storage in liquid nitrogen, seeded in ECM drops, and cultivated in the presence of 2.5 nM FGF2 for 6 days. Scale bar, 100 μm
1.Calculate the total number of organoids in the suspension (subheading 3.2, steps 21–22).
2.Centrifuge the suspension at 450 × g for 5 min.
3.Meanwhile, label the cryovials with the date, sample name, number of organoids, and any other relevant information.
4.Aspirate the supernatant. Resuspend the organoid pellet in serum-free cryopreservation medium (see Note 4). Use 1 mL of cryopreservation medium per 1000–3000 organoids (see Note 18).
5.Transfer 1 mL of suspension to each cryovial.
6.Place the cryovials in the cell freezing container and transfer to a −80 °C freezer.
7.After 24 h at −80 °C, transfer the frozen vials to a liquid nitrogen storage tank.
Cryopreserved primary organoid thawingBefore starting, prepare ice, 37 °C water bath and preheat the media.
1.Remove the cryovial from the liquid nitrogen tank and place it on ice.
2.Place the cryovial in a float in the 37 °C water bath and incubate until there is only a small amount of ice left (see Note 19).
3.Meanwhile, coat a 15 mL tube with BSA, and add 10 mL of pre-warmed DMEM/F12.
4.Add 1 mL of pre-warmed DMEM/F12 to the cryovial containing the thawed organoids and gently but thoroughly resuspend.
5.Transfer the suspension (2 mL in total) to the 15 mL tube containing 10 mL of pre-warmed DMEM/F12.
6.Centrifuge the suspension at 450 × g for 5 min.
7.Aspirate the supernatant and resuspend the pellet in 1 mL of basal organoid medium and place on ice.
8.Count the number of organoids (see paragraph 3.2, steps 21 and 22) (see Note 20).
Organoid seedingIn this paragraph, we describe procedure for seeding either fresh or revived primary mammary organoids. Before starting, prepare ice, 37 °C water bath, pre-cool PBS in a 15 mL tube, and pre-warm basal organoid medium.
1.Calculate the volume of organoid suspension required to obtain the desired number of organoids per condition and well (see Note 21):
$$\mathrm V\;\left(\mathrm\;\mathrm\right)\;=\frac\right)}\right)}$$
2.Transfer the appropriate volume of organoid suspension into a 1.5 mL BSA-coated centrifuge tube (see Note 22).
3.Centrifuge the suspension at 450 × g for 5 min.
4.Place the tubes on ice and remove the supernatant (see Note 23).
5.Use a 10 µL automated pipette to resuspend the organoids in the remaining supernatant, taking care not to create bubbles.
6.Add the required volume of the ECM gel to the tube containing the resuspended organoids (50–70 µL/well), resuspend and place on ice.
7.Place the cold PBS and 24-well plate on ice.
8.Using a 200 µL pipette, create 3–6 mm wide discs (round patches) of ~ 10 µL ECM each at the bottom of the wells. Before taking up the ECM gel in the pipette tip, precool the pipette tip with the cold PBS (by pipetting the cold PBS in and out of the tip) (see Note 24).
9.Once all the discs have been created, incubate the plate 10–15 min at 37 °C.
10.Use the pre-cooled pipette tip to resuspend the organoid suspension in the ECM gel. Take the desired volume of the suspension (50–70 µL) and pipette it into the center of the previously created disc. Avoid making bubbles (see Note 25). Discard the tip.
11.Repeat step 10 until all of the organoid suspension is used up and all desired culture wells are populated with the organoids. Place the plate in the tissue culture incubator at 37 °C, 5% CO2 for 30–60 min to allow the ECM gels to solidify.
12.Meanwhile, prepare culture medium variants according to your experimental setup (e.g., adding growth factors or drugs) and warm them up in the water bath. When using a 24-well cell culture plate, use 1 mL of medium per well.
13.After incubation, when the ECM gels have set, add 1 mL of preheated medium variants to each of the culture wells. Place the plate in the tissue culture incubator and incubate for several days according to the experimental plan.
14.Change the culture medium every 2 days, or according to your experimental design.
Organoid culture method from single cellsAs an alternative to epithelial fragments, mammary organoids can be grown from single mammary epithelial cells. Here we present a protocol optimized to produce organoids that are better suited for morphogenetic studies using an inverted light sheet microscope (LSM). Since inverted LSM has a more limited focal depth compared to multiview LSM, both the placement and size of the sample significantly affect imaging quality. Therefore, smaller organoids are more appropriate for imaging on an inverted LSM system. Please also see previous versions [18,19,20] of this protocol, which have been adapted for a number of applications.
1.Harvest mammary glands as described in Sect. 3.1.
2.Place three mammary glands without mechanical dissociation in 5 mL of digestion solution 2 in a loosely capped 50 mL tube. Digest for 15–16 h at 37 °C.
3.Wash the resultant organoid suspension with 40 mL of PBS.
4.Centrifuge at 450 × g for 5 min at RT.
5.Remove the supernatant, and resuspend the pellet in 5 mL of trypsin-EDTA. Screw the cap loosely onto the tube, and incubate it for 20 min at 37 °C.
6.After the incubation, stop the digestion by adding 40 mL of STOP medium.
7.Centrifuge the cells at 450 × g for 5 min at RT.
8.Discard the supernatant and resuspend the pellet in 3 mL of MEGM.
9.Plate the cells onto collagen I–coated 3.5-cm dishes (6-well plates). Incubate the plates in a tissue-culture incubator at 37 °C, 5% CO2 for 26–30 h.
10.Aspirate the medium and wash the plate with PBS. Treat the attached cells with 0.5 mL of trypsin-EDTA (prewarmed to 37 °C) and incubate at 37 °C, 5% CO2 until the cells detach.
11.After cell detachment, inactivate the trypsin with 9 mL of STOP medium and transfer the suspension to a 15 mL tube.
12.Centrifuge the cells at 190 × g for 5 min at RT.
13.Discard the supernatant, and resuspend the cells in 1 mL of MEGM.
14.Count the number of single cells using a cell counting chamber. Exclude dead cells, erythrocytes, and cell aggregates from your count.
15.Working quickly, mix 10,000 to 12,000 cells (in 10–20 μL MEGM) with 100 μL of Matrigel on ice. Dispense 95 μL into one well of a 12-well tissue-culture plate.
16.Let the gels solidify on a level surface in a cell culture incubator at 37 °C for 30 min.
17.Add 1.5 mL of MEGM to each gel, and incubate at 37 °C in a tissue culture incubator. Replace the medium every 2 days. Organoids are typically grown till 8-10 cell stage, which corresponds to 3 days in culture.
Collection of organoids for mountingWe describe a sample mounting strategy for two different LSM setups when preselection and preservation of organoid morphological features are required for imaging. The following steps, inspired by a protocol for organoid mounting for immunostaining [21], are common to both LSM approaches and should be performed under a stereomicroscope.
1.To prepare an ECM “dispenser”, place a sterile insulin syringe with needle in the refrigerator at least 2 h before starting. When the syringe has cooled down, working in a cell culture hood, aspirate a small amount (about 100 µL) of ECM gel in it, cover the needle with a cap to keep it sterile, and place it on ice (see Note 26).
2.Use a 100 mm tissue culture dish to prepare the collection chamber. If you are collecting samples from multiple conditions, use a permanent marker to mark individual areas on the bottom of the dish. Mark each area with a sample identifier (e.g. number or name). Line the bottom of the dish with a sterile parafilm (see Note 27).
3.Prepare and preheat fresh phenol red free organoid culture medium (either basal organoid medium or MEGM) according to your experimental conditions.
4.Create 50 µL drops of the preheated medium in all areas of the collection chamber.
5.Place the 24-well plate containing the organoid culture under the stereomicroscope and locate the desired organoids.
6.Using two 24 G needles cut the ECM gel around the selected organoids (see Note 28). Gently move the organoids to the edge of the ECM drop. Repeat this step until you have collected the desired number of organoids.
7.Use a 200 µL pipette with cut sterile tips to collect the excised organoids (see Note 29). To prevent sticking of the organoids to the pipette tip, first aspirate a small amount of the medium in the tip, then continue to aspirate the organoids. Transfer the organoids to the appropriate drop in the collection chamber.
8.Repeat the collection until you have acquired desired number of organoids in all experimental conditions.
9.Once all the organoids have been collected, use the 200 µL pipette to slowly remove (almost) all of the medium from each of the drops in the collection chamber. Monitor the process under the stereomicroscope to avoid collecting the organoids.
10.Add 50 µL of the phenol red free organoid culture medium to the organoids.
11.Proceed immediately to the next steps for organoid mounting. We describe a sample mounting strategy for two different LSM setups when preselection and preservation of organoid morphological features are required for imaging.
Organoid mounting for a multiview LSMMultiview LSMs typically have an imaging chamber and a stage that can be adapted for different sample types, holders, and mounting solutions. FEP tube fragments are the main component of our organoid sample holder and this section describes how to prepare them and load them with samples. To prepare appropriate environmental conditions for imaging, clean the imaging chamber with 70% ethanol or sterilize it by gamma irradiation and then set the temperature to 37 °C and CO2 to 5%.
Organoid mounting in an FEP tube fragmentTo prevent rapid ECM polymerization, perform the following steps at a low temperature. Keep instruments on ice, pre-cool the room using air conditioning, or work in a cold room. When handling ECM, work quickly and minimize manipulation to preserve the texture and integrity of the ECM surrounding the sample.
1.Using a surgical scalpel, pre-cut the FEP tube into approximately 1–3 mm long fragments (see Note 30).
2.Collect the fragments in a centrifuge tube and sterilize them by gamma irradiation.
3.Cut a thin (10 × 100 mm) piece of parafilm and wrap it diametrically around the bottom of a 100 mm cell culture dish (save the lid for later steps): Using about a half of the parafilm, make one layer first. Then place a sterile 1 mL syringe with a removable 26 G needle on the parafilm on the dish and use the rest of the parafilm to secure the syringe in the position (Fig. 3a, b).
Fig. 3
Equipment and crucial mounting steps for a multiview LSM. a Equipment needed for assembling sample holder; from left 100 mm cell culture dish, 24–26 G needle, 1 mL syringe, a piece of parafilm. b An assembled holder with mounted FEP tube fragment (indicated by an arrowhead). c-j Stages of organoid mounting. c Empty FEP tube fragment. d FEP tube fragment loaded with ECM. e FEP tube fragment with ECM and mounted organoid (white arrowhead) with the drop of media. f FEP tube with a mounted organoid (white arrowhead) covered with ECM. g Higher magnification of F. h Syringe mounted in multiview stage adapter. i Holder with an organoid (white arrowhead) mounted in a multiview LSM stand in an imaging chamber (j)
4.Using the remaining lid of the 100 mm cell culture dish as a sterile surface, place a sterile FEP fragment on the lid. Position the fragment horizontally so that both ends of the fragment are visible and only the walls of the tube fragment touch the plastic of the dish.
5.Remove the needle from the syringe and pierce the FEP fragment through the center. Lift the needle with the FEP fragment and place it back on the syringe.
6.Using a stereomicroscope, locate and observe the needle tip containing the FEP fragment. Using a sterile 10 µL pipette tip, position the FEP fragment so that the openings are horizontal (see Note 31) (Fig. 3c).
7.Take the insulin needle containing the ECM gel and inject the gel into the FEP fragment from one side until it forms convex domes on both sides of the FEP fragment (Fig. 3d). Put the cap on the needle and place it back on ice.
8.Using a pipette with sterile-cut 10 µL pipette tips, collect the organoids from the collection chamber drop. Observe the drops under a stereomicroscope and use no more than 3 µL of medium to collect the organoids.
9.Locate the needle containing the ECM-filled FEP fragment and pipette the organoids to one side of the FEP fragment (see Note 32) (Fig. 3e). Use the same pipette to remove excess medium while keeping organoids on the ECM-filled FEP fragment.
10.Take the insulin needle with ECM gel and place small drop of ECM gel on top of the organoids (Fig. 3f, g). This will seal them between two layers of ECM gel and ensure that they remain in place during the imaging.
11.To image multiple organoids simultaneously, repeat the process on the other side of the FEP fragment (see Note 33).
12.Allow the ECM gel to polymerize for 5–10 min at RT (see Note 34).
13.Place the entire 100 mm dish with syringe and mounted organoids in a closed dark chamber (see Note 35) and transfer it to your LSM location.
14.There are two ways to place the syringe holder on the microscope, depending on the user’s dexterity level: Insertion through a stage opening (Sect. 3.8.2) or insertion through the microscope chamber door (Sect. 3.8.3). It is important to work as carefully as possible and to prevent the FEP fragment from touching any surfaces, as this would result in the loss of the sample. The first approach is faster, but the risk of losing the sample is higher. The second approach is safer but requires the ability to manipulate the microscope hardware.
Direct specimen insertion through stage opening 1.Gently remove the syringe containing the needle and the FEP fragment from the parafilm.
2.Slide the entire holder into a round adapter for multiview LSM and lock it in place (Fig. 3h).
3.Place the adapter with the syringe in the microscope in the same way as the glass capillaries (see Note 36.
4.Lower the microscope stage so that the holder and specimen are immersed in the medium (Fig. 3i, j).
5.Locate the specimen and set acquisition parameters according to your experimental design.
Inserting the specimen through the microscope chamber door 1.Gently remove the needle containing the FEP fragment from the syringe. Balance it on the sterile surface or place it on the rim of the culture dish, making sure that FEP fragment remains in the air.
2.Remove the syringe from the parafilm and place it in the adapter for multiview LSM (Fig. 3h).
3.Place the adapter with the syringe in the microscope in the same way as glass capillaries.
4.Withdraw the medium from the imaging chamber and remove the chamber from the microscope. Lower the microscope stage so that the tip of the syringe is visible.
5.Replace the needle with the FEP fragment on the syringe and raise the microscope stage to the initial position (Fig. 3i).
6.Return the imaging chamber to the microscope and refill it with medium.
7.Lower the microscope stage so that the holder and specimen are immersed in the medium (Fig. 3j).
8.Locate the specimen and set acquisition parameters according to your experimental design.
Organoid mounting for inverted LSMFor an inverted LSM setup, special FEP foil wells are designed to complement the geometry of the microscope objectives. The specimen is placed at the bottom of the well, where the double-sided light sheet illumination excites the fluorophores, while an inverted camera (placed on the bottom side of the well) detects emission. In the example Luxendo TruLive3D LSM, a maximum of 6 wells can be used simultaneously. Here we describe two approaches to mounting samples in V-shaped wells, depending on the type of the sample. The first (Sect. 3.9.1) is designed for cases where specific morphological features need to be preserved and therefore the ECM cannot be removed. The second approach (Sect. 3.9.2) is particularly useful when a larger number of smaller, morphologically uniform samples need to be imaged [22], and a temporary removal of ECM would not affect cellular behavior and organoid morphology. Prior to imaging, set the microscope environmental control to 37 °C and 5% CO2 and allow the temperature and CO2 levels to stabilize.
Mounting of large organoids with specific morphological features 1.Prepare the V-shaped wells: Open the sterile container and use tweezers to lift the sterile V-shaped wells from the attaching adhesive surface (see Note 37), place them in the manipulator holder, and mark the top edge (see Note 38) (Fig. 4a).
Fig. 4
Equipment and crucial mounting steps for an inverted LSM. a Labelled V-shaped sample holders in a manipulation stand. b V-shaped imaging holders in an imaging chamber. c-e Crucial steps in sample mounting. Creation of Matrigel drop (c), spreading the drop on the bottom of the holder (d) and addition of organoids (e)
2.To facilitate the transport and maintain aseptic conditions, place the holder with wells on a 100 mm cell culture dish (Fig. 4a).
3.Using a stereomicroscope, locate and observe the inner bottom of the well.
4.Using the ECM dispenser (prepared in Sect. 3.6), add a small drop (up to 5 µL) of ECM gel to the bottom of the well (see Note 39) (Fig. 4c). After use, cap the needle and return the dispenser on ice.
5.Take a 10 µL pipette tip in your hand and using it spread the ECM drop lengthwise across the bottom of the well (Fig. 4d).
6.Use a pipette with a sterile cut 10 µL pipette tip to collect the organoids from the collection chamber drop. Observe the drops under a stereomicroscope and use no more than 3 µL of medium to collect the organoids.
7.Locate the bottom of the V-shaped well with the line of ECM gel and transfer the collected organoids to the center of the gel line (see Note 40) (Fig. 4d).
8.Once you have transferred all the desired organoids to the well (see Note 41), observe the volume of the medium in the well. If there is more than 3–5 µL of medium in the well, use sterile 10 µL pipette to remove the excess. Observe the process under the stereomicroscope and avoid picking up the organoids or ECM gel.
9.Use the ECM dispenser to add small drops of ECM to the top of the organoids (see Note 42). This will trap them in the ECM gel, provide the necessary growth conditions, and prevent unwanted movement during medium addition and image acquisition.
10.Repeat steps 3 through 9 to add organoids to the remaining wells.
11.When all the organoids are mounted, place the holder with the wells in the cell culture incubator for 5–10 min.
12.Fill the wells with preheated phenol red free organoid culture medium (such as basal organoid medium or MEGM) with growth factors and/or inhibitors according to your experiment, using a maximum of 400 µL per well.
13.Place the holder with the wells in the cell culture incubator for a minimum of 2 h.
14.Transfer the holder with the wells to the inverted LSM and place the wells in the stage holder of the microscope (Fig. 4b). Continue with your standard workflow to locate the sample and set up acquisition parameters according to your experimental design.
Mounting of small, single-cell-derived organoids with uniform morphological features 1.Digest the ECM: Add 4 µL of collagenase stock solution (equivalent to 300 U of collagenase) to each well (which already contains a 100 µL gel with organoids and 1 mL of MEGM medium). Resuspend the gels using the mechanical force of a 1000 µL pipette; pipette vigorously up and down 6–8 times (see Note 43). Incubate for 50 min at 37 °C, 5% CO2 (see Note 44).
2.Resuspend the digesting suspension again, then collect and transfer the contents of the wells to a 15 mL centrifuge tube. Typically, a maximum of 6 initial 100 µL gels are transferred to one 15 mL centrifuge tube (see Note 45). Fill the tube(s) up to 14 mL with PBS.
3.Centrifuge the samples at 190 × g for 5 min (see Note 46).
4.Aspirate the supernatant gently, leaving approximately 600–1000 µL of culture medium to avoid disturbing the pellet. Resuspend the pellet vigorously in the remaining supernatant using a 1000 µL pipette, rinsing the walls of the tube (see Note 47).
5.Fill up the tube(s) with STOP medium. Add 5–8 µL of DNase I stock solution and incubate for 3–5 min at RT.
6.Centrifuge the samples at 190 × g for 5 min.
7.Aspirate the supernatant gently, leaving around 600–1000 µL of medium to avoid disturbing the pellet. Fill up the tube(s) with PBS a
Comments (0)